Cleaning headlights update :
Remove the 6 x metal pins on the headlight. And all the bulbs u can, I left half of them in.
Set your oven (ive got a fan forced) to 85 degrees', I threw the first headlight in when the oven was stone cold, so i set the timer to 15mins, then pulled it out, took 2 flathead screw drivers and attacked it, and she split open within 1-2 mins of work.
With the second headlight since the oven was still on, I put it in for 9 mins which was more than enough time, and once again attacked it with the flathead screw drivers.
REMEMBER : dont put them in for that long, my times worked for me, if theyre in there too long could damage the light, but with my times above and that type of oven things worked well.
Now you ahve the problem of your flathead screw drivers being covered in that black silicon crap from the join in the headlights, to remove this crap, get a match light it, and hold the flathead screw driver over the flame. and rotate the flathead screwdriver like a pig on the spit, once ur burning ur fingers *stop* grab a tissue and just wipe the black stuff off, took me a couple times to get the flathead screw drivers clean again.
Pics included of the screw drivers, so u guys can see exactly everything I used.
***NOTE*** upon the cleaning and polishing, as per the tech articles on MKIV.com they relate only to the early model headlights, not the 98 style headlights !!!! By this I mean on them you can clean the entire plastic insert, with the late model, do not put any plastic polisher/cleaner on the chrome rings!!! as I learnt the hardway it will corrode them, then again maybe Amy who was helping me put too much on. So treat with caution!
The total process of pulling apart the headlights took 25mins for both, much faster than my last attempt using methods off the mkiv.com tech articles (ie butterknife and lower temperature).
OUT OF THE OVEN :
Once the headlight is out of the oven, find the seam where the 2 parts join and jam a screw driver in there, like your sticking a crowbar into a box and trying to pry it open, same principle, now once you do this you will start to see it splitting apart, jam the other screw driver in and use the first (or however u like) to break away most of the silicon, then continue along the top, once u have done almost 3/4 of the top you can (well i was able to) pull the 2 sections apart carefully as the majority of the seal was broken.
Now for cleaning agents, the stuff mkiv.com and some other tech articles recommend isnt exactly very plentiful in this side of the world (keepin in mind mkiv.com is US based) so after amy and I did our research around we ended up with
Meguiars - Mirror Glaze 10 - Clear Plastic Polish 236ml
Meguiars - Mirror Glaze 17 - Clear Plastic Cleaner 236ml
2 x sheets of 2000grit sandpaper
1 tube of RTV Clear Silicone - adehisive / sealant, high press / temp resistant (might want 2 tubes)
scored the meguiars stuff for $15.99 ea from autobarn, get a couple of lintfree clothes (in our case - old tea towels etc) , sandpaper from bunnings or was it supercheap, Cannit where we get that from?
Once you've pulled the 2 main sections apart, you've got the inside of the headlight (shiny bit) to pull out, theres 2 clips holding it in, the main one is under the middle light which can be a pain, 1 of my lights it came out easy, the other took effort.. OR it might come out with the main cover in that case just unscrew it (tiny screw cant miss it)
Now rest is easy, SCRUB SCRUB SCRUB, cant remember the exact order, might of done a wetsand on the covers to the headlights first , on the OUTSIDE , removes small scratches and all the dirt.
Then use the plastic cleaner, and then the plastic polish to finish it off, do this as many times as you like until your happy, this is the hard part where your gonna find the majority of your time, i spent like a day on each one ;P heh *picky *s#$t* i am heheh*
Once your happy with the result, its putting back together time, wack the 2 sections back in the oven again (obviously put the insert back in and screwed on) and heat it up, same process as i did before..
Now your putting it back in the oven to reheat/loosen up the sealant that was already originally there, it looks like its enough to hold it together, and it probably is, but not when marios' on the job heh, put a good thick bead of the sealant around the edges and slam the parts together (takes a fair bit of force) dont worry about it looking messy as its going to go clear anyway.
I went nuts with the sealant on headlight #1 as i didnt want gaps for moisture to get in, I could of probably gotten another tube of sealant as I went to easy on the 2nd headlight and guess wat, it got moisture in it , so one day ill rip it open and fix it up * DOH DOH *
Then depending on the sealant you want to use, i left this one 12 hours for it to set, i think thats what its instructions said... and then it was just a case of put them back into the car carefully and your done...
oh yeah, like Amy says, should take b4 after pics, I did, ill try find em, everyone who saw em, seriously thought i went out and spent $2k on replacement lights ...
It was that much of a difference !
NOTE : Soarer headlights same process apparently 1000x easier to pull apart and do this as they just have clips supposedly , dont quote
Skyline headlights , same deal im told..
*** GOOD LUCK *** and if you need any help Amy / Myself more than happy to help it is a big job, ours went over 2 days, whole weekend
but she did say im anal bout my car ;p heh or was that in general :( heh
In total i spent about $40 on products to clean the headlights
- $40 products
- 2 days cleaning / polishing (and repeated this how many times i dunno..)
We weighed that up against the cost of new ones, we were very happy
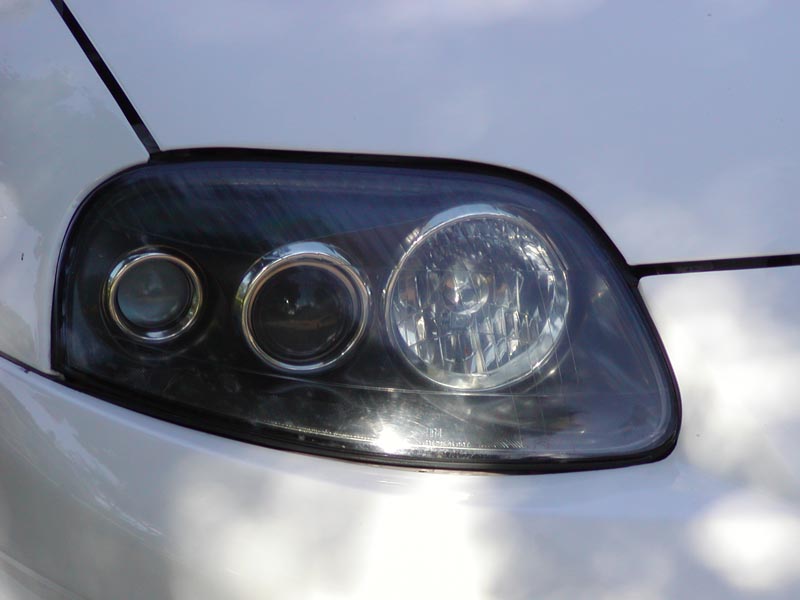
Supra Headlight - crystal clear